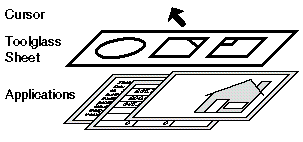
Figure 1. The three layers of our interface.
A Taxonomy of See-Through Tools
Eric A. Bier, Maureen C. Stone, Ken Fishkin, William Buxton(1), Thomas Baudel(2)Xerox PARC, 3333 Coyote Hill Rd., Palo Alto, CA 94304
(1)University of Toronto, CSRI, Toronto, ON, Canada, M5S 1A4
(2)Universite de Paris-Sud, LRI, 91 405 Orsay Cedex, FranceE-mail: {bier, stone, fishkin}@parc.xerox.com, willy@dgp.toronto.edu, thomas@lri.fr
ABSTRACT
In current interfaces, users select objects, apply operations, and change viewing parameters in distinct steps that require switching attention among several screen areas. Our See-Through Interface(TM) software reduces steps by locating tools on a transparent sheet that can be moved over applications with one hand using a trackball, while the other hand controls a mouse cursor. The user clicks through a tool onto application objects, simultaneously selecting an operation and an operand. Tools may include graphical filters that display a customized view of application objects. Compared to traditional interactors, these tools save steps, require no permanent screen space, reduce temporal modes, apply to multiple applications, and facilitate customization. This paper presents a taxonomy of see-through tools that considers variations in each of the steps they perform. As examples, we describe particular see-through tools that perform graphical editing and text editing operations.CR Categories and Subject Descriptors: I.3.6 [Computer Graphics]: Methodology and Techniques - interaction techniques; H.5.2 [Information Interfaces and Presentation]: User Interfaces - interaction styles; I.3.3 [Computer Graphics]: Picture/Image Generation - viewing algorithms; I.3.4 [Computer Graphics]: Graphics Utilities - graphics editors
Key Words: user interface, control panel, transparent, multi-hand, viewing filter, button, lens, menu, macro
Our interface allows users to interact with applications through a set of movable semi-transparent tools, called see-through tools or click-through tools. These tools are organized onto a sheet, called a Toolglass(TM) sheet. Tools may include graphical filters, called Magic Lens(TM) filters, that present a modified view of the shapes underneath them. The toolglass sheet can be positioned with the non-dominant hand and triggered with the dominant hand. For example, a right-handed user may translate and resize the sheet using a trackball and thumbwheel with the left hand and apply the tools by positioning a cursor using a mouse in the right hand. Together, the cursor, toolglass sheet, and applications create a three-layer interface as shown in figure 1. Tools are grouped into units called tiles. A toolglass sheet displays one tile at a time, just as a HyperCard stack [10] displays one card at a time.
Figure 1. The three layers of our interface.
Click-through tools are used in two, possibly simultaneous, steps. First, the user positions the tool over an application object. Second, the user clicks on that object, through the tool, with a cursor. For example, in figure 2, the user has placed a color-changing tool (shown in thick lines) over a circle and a triangle (shown in thin lines). The triangle in the upper left corner of the tool shows the color that it applies. The user applies the color to the circle by clicking a mouse button while the cursor arrow is over both the tool and the circle.
Figure 2. A click-through button is used to change the area color of a circle.
Click-through tools can save steps relative to traditional interactors. For example, the tool in figure 2 selects both an operation to apply (change color) and an object to apply it to (the circle) in a single two-handed gesture. This can save time and reduce cognitive load, because the user can combine more steps into a single mental "chunk" [6]. Initial user studies show performance improvements and user preference for click-through tools [13].
Toolglass sheets can be moved from application to application, providing a common interface to several applications. For example, the same button can be used to change the color of a shape in a graphical editor or a word in a text editor. In addition, our interface alters the traditional relationship of application programs and data; instead of loading a document into an application program and then working within the limitations of that program, the user can bring applications, in the form of see-through tools, to the document.
See-through tools make good use of the coarse-positioning skills of the non-dominant hand, which have been described by Guiard [11]. However, unlike interfaces that require holding down modifier keys, this interface can be used, with reduced speed, when only one hand is available; the user can drag a tool into place with the mouse cursor and then apply it.
These tools have many other potential advantages. Toolglass sheets take up no permanent screen space. See-through tools replace temporal modes, which can be difficult to get into and out of, with spatial modes, which are entered and exited by moving the sheet. They allow the user's gaze and the mouse cursor to remain in the work area. They can be rearranged by copying or dragging. They can be composed by overlapping, providing users with a visual way to create their own macros. They can be added incrementally to a user interface based on traditional interactors. Finally, when a tool includes a magic lens filter, it provides the user with a modified view of the application objects that helps in the use of that tool.
The discovery of many examples of useful see-through tools has made it clear that they define a large new design space for user interfaces. In this paper, we describe some tools that we have found interesting and instructive. We also describe a taxonomy of see-through tools, which provides both an overview of the see-through interface system for those interested in understanding its potential, and an understanding of the ways that these tools may vary that will aid implementors of such tools. We structure this material as a taxonomy because our own exploration of the see-through interface paradigm proceeded by discovering particular tools and then categorizing them. A previous paper on this interface describes its implementation and its uses for graphical editing and visualization [4].
See-through tools have been implemented on several platforms. Most of the tools described here are implemented in the Multi-Device Multi-User Multi-Editor (MMM) framework [3] in the Cedar programming environment [22], which runs on SunOS. Tools for visualizing maps and editing graphics are implemented in C++ in the X Window system. An implementation on the Apple Macintosh is in use for human factors studies [13]. The tools of figures 5, 6, 11, 14 and 15 are envisionments of tools that will be implemented in the future; the rest are existing tools.
The rest of this paper is organized as follows. We describe related work. Then we describe five basic steps in the operation of a see-through tool. The next five sections describe a set of see-through tools that illustrate variations in each of these five basic steps. In addition, each of these sections describes one or more types of variation of a given basic step and expresses each type of variation as an axis of our taxonomy. The remaining sections summarize the taxonomy and present conclusions and plans for future work.
Two-handed interfaces. As in VIDEOPLACE, our interface allows the use of two hands simultaneously [14]. However, our tools make an asymmetric use of the hands, with the non-dominant hand defining a coarse frame in which the dominant hand works. As noted by Guiard, such asymmetric bimanual activity is both natural for people and very common in everyday activities [11]. Buxton and Myers showed in a scrolling and text selection activity that users tend to overlap the use of both hands [7]. Our interface takes advantage of this insight to support a general-purpose user interface paradigm.
Movable tools. Previous systems allow the user to position commands over the application work area. For example, Macintosh tear-off menus [16] can be dragged by their borders and positioned for later use. Our tools differ in that the tool and cursor can move independently.
Transparent tools. Many CAD tools display partly-transparent stationary menus on top of the application work area. The Markup graphics editor displayed a semi-transparent pop-up menu of modes [17]. Recent work allows menus to be made transparent in X windows [1]. One author has proposed the use of transparent windows [20]. Our tools are unique in that they are both two-handed and use the position of the cursor over a tool and over the underlying application to determine the result of an interaction.
Visual filters. Many window systems include a movable pixel magnifier to enlarge a region of the screen. Recent image processing systems support a wide variety of filter operations including composition of overlapping filters [19]. A portal in the Pad system can present a modified view of the part of the workspace seen through it [18]. Related work on visual filters has been described in more detail [4]. Previous systems did not allow the filter to be moved with the non-dominant hand nor to be combined with click-through tools.
Taxonomies. In their classic paper, Foley and Wallace describe the value of virtual devices and identify pick, button, locator, and valuator as categories of tools [9]. See-through tools blur some of these categories. A click-through button can also be a pick because the user can click on a button and an application object at the same time. Likewise, a button can also be a locator because the user can click on a button and specify an application position at the same time. While their taxonomy is concerned almost exclusively with function, ours includes issues of triggering, appearance, motion, and instantiation.
Figure 3. Information flow in a see-through tool.
The italic labels in figure 3 show four steps in the operation of a see-through tool: receiving a triggering event from the user (Trigger), computing an action based on that event and having an application perform that action (Action), computing the appearance of the tool and the application as seen through it (Appearance), and moving over application objects (Motion). A fifth step, instantiation on a toolglass sheet (Instantiation), is not shown. This section defines and describes these five steps.
Trigger. As with traditional tools, the user can trigger a see-through tool with a variety of actions including mouse clicks or pen gestures. Any trigger may come to a tool via another see-through tool that overlaps it.
Action. In response to a triggering event, a see-through tool produces a command to be executed. This command may be executed by the tool itself or passed to the application underneath it. The action may cause data to flow from the tool to the application and/or from the application to the tool, as indicated by the bidirectional arrows in figure 3. While many actions consist of a short message, actions may contain a large quantity of data, such as an entire disk file. The action produced may be applicable to only a single application, or may be expressed in an application-independent format. Application-independent commands implemented in our system include selection, creation, deletion, and modification of graphical properties, such as font and color. When several see-through tools are composed by overlapping them, the action may include contributions from each of these tools.
Appearance. Like traditional tools, a see-through tool may draw a picture that identifies its boundary and function. However, because it overlaps underlying applications, a tool's picture often contains elements that are transparent, translucent, or small in order to avoid obscuring the application underneath. In addition, a tool may modify the appearance of the application underneath using a magic lens filter [4][5][21]. For example, a tool that selects text characters may display visible symbols to distinguish SPACEs from TABs. A related paper describes many uses of movable filters in user interfaces [21]. Thus, we discuss filters only briefly in this paper.
Motion. In general, a toolglass sheet and all of its tools translate as a unit under the control of a 2D valuator such as a trackball and resize as a unit under the control of a 1D valuator such as a thumbwheel. However, some tools may change their relationship to the sheet (and to other tools), e.g., by translating, rotation, or resizing. This relative motion may be triggered either by an explicit request or in response to the presence of particular applications or application objects below the tool.
Instantiation. Before it can be used, a see-through tool must be instantiated on a toolglass sheet. The tool may appear whenever this sheet is used, only when this sheet is in a particular temporary mode, or only when this sheet is in a particular position relative to the application. The tool may be customized to a greater or lesser degree by the user. A tool may be built from any number of see-through components; a simple tool will have only one component, a complex tool may have dozens or more.
Each of the next five sections considers one of the five steps, presenting examples that illustrate variations in that step's behavior. Where several types of variation are present for a single step, each type is discussed in its own subsection. Each type of variation is an axis of our taxonomy.
The user can trigger a tool in a variety of ways, including clicking with a mouse, dragging (pressing a mouse button, moving the mouse while the button is held down and then releasing at a new position), or gesturing (e.g., drawing a stroke, character or symbol on the tool). In addition, tools can receive input from other see-through tools that are layered above them.
While the triggering events are familiar, doing them over see-through tools instead of over editors or traditional interactors allows more information to be extracted from each event; the tool and the application are both under the cursor position, so each token of the input can operate on the tool, the application or both. For example, one click on the button of figure 1 chooses a command and an operand simultaneously.
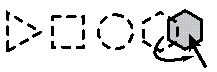
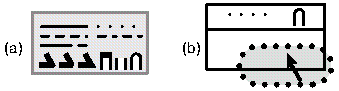
Dragging events may begin inside a click-through button and end outside of it. When applied to a shape creation palette this results in a "drop-and-drag" (not drag-and-drop) operation, as shown in figure 4. Here, each dashed shape is a click-through button. When the mouse button goes down over a shape, a copy of that shape is added to the scene, made opaque, and attached to the cursor. The object then moves with the cursor until the mouse button goes up, allowing fine positioning of the new shape.
Figure 4. Drop-and-drag from a shape palette.
Dragging may also begin outside of a tool and end inside it. For example, a shape may be dragged in a traditional way to a printer icon located on the toolglass sheet, causing the document to be printed. This is drag-and-drop with the target of the drop on the sheet.
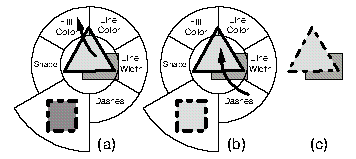
A stroke gesture may begin in one part of a tool and end in another. Figure 5 shows a tool that combines single stroke gestures (like those used in Kurtenbach's Marking Menus [15]) with pie menus [12]. In figure 5(a), the user strokes from a graphical shape (a triangle) positioned under the circular center button of the menu to a button labelled "Fill Color", to apply the fill color of the triangle to the rectangular prototype object that is part of the tool. Conversely, in figure 5(b), the user strokes from the "Dashes" button to the circular center button to apply the dash pattern of the prototype to the triangle. Figure 5(c) shows the result.
Figure 5. Property Sampler/Applicator. (a) Sampling fill color. (b) Applying dashes. (c) The result.
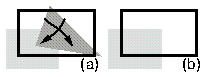
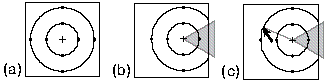
A common problem with gesture interfaces is that it is hard for the system to distinguish input that is intended as a gesture from input intended as writing or drawing. Our solution is to use a see-through tool as the gesture interpreter. In figure 6, the user moves a gesture-interpreting tool (solid black lines) over a drawing and deletes a triangle with a gesture. Note that the same gestures can be used in multiple applications because the gesture interpreter can be moved from one application to another.
Figure 6. A gesture tool. (a) A deletion gesture, 'X', is made. (b) The triangle is deleted.
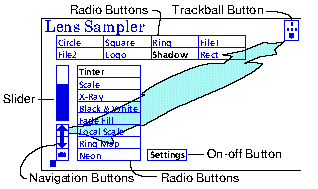
Figure 7. The Lens Sampler tile.
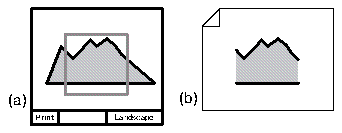
Some tools mostly send information to the application, such as the shape creation palette of figure 4. Others mostly receive information. For example, the Print Tool of figure 9(a) picks up application shapes, clips them to a rectangle, positions them on a page of specified size and creates a file that prints as shown in figure 9(b).
Figure 8. Graphics Clipboard.
Figure 9. The Print Tool (a) Specifying the print parameters. (b) The resulting printed page.
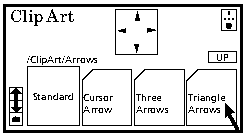
Figure 10. The Clip Art tool.
Application-independent tools are more valuable because the investment in learning to use them pays off in many different contexts. This is in contrast to current tools that are bound to an application, requiring, as Bruce Tognazzini put it, "having to slide your entire house inside a hammer before you can hang a picture on the wall" [8].
Figure 11. Making a macro. (a) A traditional control panel. (b) Applying a macro to an oval.
Deletion tools can be built with magic lens filters that make it easy to find the object to be deleted and make it easy to undo a mistake. For example, a filter in the tool can show the objects that were most recently deleted. Clicking on a "ghost" object causes its deletion to be undone.
Of the many modification tools, see-through tools that modify shape, position, size, or orientation are particularly interesting because they can incorporate visual guidelines, such as the alignment lines and circles of snap-dragging [2]. Figure 14, which will be described below, is an example.
Figure 12. Color editor for fill and line colors.
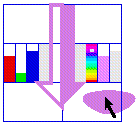
See-through tools can also integrate the process of getting a current value, modifying it, and applying it. The color editor of figure 12 has four click-through buttons and six sliders. The upper-left and upper-right rectangles pick up a line color and fill color respectively. The red-green-blue sliders on the left or the hue-saturation-value sliders on the right can modify the color. The arrow in the middle shows the resulting color. The lower-left and lower-right rectangles apply this color to lines or filled regions, respectively. The shape in figure 12 is receiving a new fill color.
To support composition, a tool must be willing to accept a command that has come from another tool and emit a modified command that blends its function into the received command. This blending may be done in several ways: A tool may append its command to end of the incoming one, prepend its command to the beginning, or modify the incoming command in a more general way. For example, a tool that protects illustrations from being edited would remove, from any command it receives, all requests to edit the objects below.
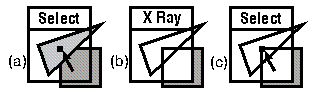
Figure 13. Three tools. (a) Vertex selector. (b) X-ray filter. (c) Vertex selector with x-ray filter.
The toolglass sheet moves relative to objects on other layers, including the cursor, the screen, and applications. Each of these other objects provides a reference frame that a see-through tool may move with. Most of our tools move and resize as a unit with the sheet. However, our grid tools draw their grids relative to the coordinate system of the screen (to allow inter-application alignment) or relative to a particular application.
Some tools are a hybrid, moving with the sheet some of the time and with scene objects at other times. So long as the object doesn't move into the space of other tools, these motions cause little confusion. For example, figure 14(a) shows a tool whose parts translate relative to scene objects. This alignment tool consists of two circles. When the center of the tool is positioned near a scene vertex, the circles move to snap their centers to that vertex using snap-dragging gravity [2] as shown in figure 14(b). The user can then use the circles to add a new line of known length as shown in figure 14(c). This tool is like a template that is held in the non-dominant hand while the user draws with the dominant hand.
Figure 14. An alignment circles tool.
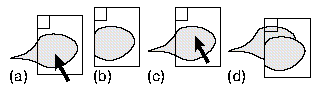
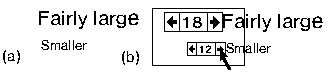
Tools may even move with specific application objects. For example, the large rectangle in Figure 15(b) is a magic lens filter that creates a small control panel next to the left edge of each text object. The control panel displays the current font size of the text and includes arrows that increase or decrease the font size when pressed. This tool replaces traditional tools that select text, query its current size, and change that size.
Figure 15. A font-size tool. (a) Some text. (b) The filter reveals font size controls. The user makes some text larger.
Tools may move in a variety of ways including translating, rotating, or scaling. For example, we envision a text creation tool that can be rotated relative to the sheet. By rotating this tool, the user indicates the orientation that new text will have.
On the other hand, to reduce screen clutter, other tools appear only when needed. For example, the radio buttons in figure 7 appear when the button named "Settings" is on and disappear when it is off. Likewise, the font-size changing buttons of figure 15 appear only when text strings are present.
While a few of these 14 axes depend on each other, they are largely
orthogonal. Thus, any value on one axis can be combined with almost any
value on any other axis, resulting in a large design space. The Composition
and Input Transparency axes are related, in that composition rules on input
make sense only if some overlapped tools are click-through. Persistence
and Moves With are related in that tools that appear in response to data
will most likely move with that data rather than with something else.
| Trigger Type: | Click, Drag-out, Drag-in, Drag-out-and-in, Gesture, Overlapped tool |
| Input Transparency: | Click-through, Click-on |
| Data Direction: | Down, Up, Both |
| Data Magnitude: | Simple command, ..., Database |
| Application Indep.: | No, Yes |
| Application: | Graphics, Text, Other click-throughs, Traditional tools, ... |
| Operation Class: | Select, Create, Delete, Modify, ... |
| Composition: | Append, Prepend, Modify |
| Output Transparency: | Opaque, Stippled, Translucent, Transparent |
| Moves With: | Sheet, Application, Both, Object, Cursor |
| Lens Presence: | No, Yes |
| Customization: | None, Parameters, Editable |
| Persistence: | Always, Temporal mode, Appears in context |
| Complexity: | Single part, ..., Many parts |
As the examples in this paper indicate, interesting tools can be found throughout the space determined by these axes.
This paper does not present the only possible taxonomy of see-through tools, and none of our example tools is likely to be the best see-through tool for performing a given function. However, our examples and taxonomy do show that, far from being just a new way to present transparent menus, the see-through interface system is a vast new design space for user interface tools. Furthermore, effective tools can be found throughout the space, making it well worth exploring.
This paper should help to stimulate the imaginations of those interested in creating see-through tools. In addition it should be of value to those building toolkits for see-through tools. Each of our axes suggests a kind of tool variability that the toolkit may need to support.
Trademarks and Patents: Magic Lens, Toolglass and See-Through Interface are trademarks of the Xerox Corporation. Xerox is seeking legal protection for these ideas.
2. Eric A. Bier and Maureen Stone. Snap-dragging. Proceedings of Siggraph '86 (Dallas, August), Computer Graphics, Vol. 20, No. 4, ACM, 1986, pp. 233-240.
3. Eric A. Bier and Steve Freeman. MMM: a user interface architecture for shared editors on a single screen. Proceedings of the ACM SIGGRAPH Symposium on User Interface Software and Technology (South Carolina, November), ACM, 1991, pp. 79-86.
4. Eric A. Bier, Maureen C. Stone, Ken Pier, William Buxton, and Tony D. DeRose. Toolglass and Magic Lenses: The See-Through Interface. Proceedings of Siggraph '93 (Anaheim, August), Computer Graphics Annual Conference Series, ACM, 1993, pp. 73-80.
5. Eric A. Bier, Maureen C. Stone, Ken Pier, Ken Fishkin, Thomas Baudel, Matt Conway, William Buxton and Tony DeRose. Toolglass and Magic Lenses: The See-Through Interface (videotape, 10 minutes). In the formal video program of this conference.
6. William Buxton. Chunking and phrasing and the design of human-computer dialogues. Proceedings of the IFIP World Computer Congress (Dublin, Ireland), 1986, pp. 475-480.
7. William Buxton and Brad A. Myers. A study in two-handed input. Proceedings of CHI '86 Human Factors in Computing Systems (Boston, April), ACM, 1986, pp. 321-326.
8. A. Brady Farrand, Marc Rochkind, Jean-Marie Chauvet, Bruce Tognazzini, David C. Smith. Common elements in today's graphical user interfaces: the good, the bad, and the ugly. Proceedings of Interchi '93, Human Factors in Computing Systems (Amsterdam, April), ACM, 1993, pp. 470-473.
9. J. D. Foley and V. L Wallace. The art of natural graphic man machine conversation. Proceedings of the IEEE, Vol. 62, No. 4, April 1974. Reprinted in IEEE Tutorial on Computer Graphics (2nd ed.), pp. 315-324.
10. Danny Goodman. The Complete HyperCard Handbook. Bantam Books, 1987.
11. Yves Guiard. Asymmetric division of labor in human skilled bimanual action: the kinematic chain as a model. The Journal of Motor Behavior, Vol. 19, No. 4, 1987, pp. 486-517.
12. Don Hopkins. The design and implementation of pie menus. Dr. Dobb's Journal, Vol. 16, No. 12, December 1991, pp. 16-26.
13. Paul Kabbash, Abigail Sellen, and William Buxton. A comparison of two-handed click-through tools to traditional menu input. Included in these proceedings.
14. Myron W. Krueger, Thomas Gionfriddo, and Katrin Hinrichsen. VIDEOPLACE - An artificial reality. Proceedings of CHI '85, Human Factors in Computer Systems (San Francisco, April), ACM, 1985, pp. 35-40.
15. Gordon Kurtenbach and William Buxton. Issues in combining marking and direct manipulation techniques. Proceedings of the ACM Symposium on User Interface Software and Technology (UIST '91, S. Carolina, November), ACM, 1991, pp. 137-144.
16. MacDraw Manual. Apple Computer Inc. Cupertino, CA 95014, 1984.
17. William M. Newman. Markup. Alto User's Handbook, Xerox Palo Alto Research Center, 3333 Coyote Hill Rd., Palo Alto, CA 94304, 1979.
18. Ken Perlin and David Fox. Pad: an alternative approach to the computer interface. Proceedings of Siggraph '93 (Anaheim, August), Computer Graphics Annual Conference Series, ACM, 1993, pp. 57-64.
19. ImageVision, Silicon Graphics Inc., Mtn. View, CA.
20. Loretta Staples. Representation in virtual space: visual convention in the graphical user interface, figure 14. Proceedings of Interchi '93, Human Factors in Computing Systems (Amsterdam, April), ACM, 1993, pp. 348-354.
21. Maureen C. Stone, Ken Fishkin, Eric A. Bier. The movable filter as a user interface tool. Included in these proceedings.
22. Daniel C. Swinehart, Polle T. Zellweger, Richard J. Beach, and Robert B. Hagmann. A structural view of the Cedar programming environment. ACM Transactions on Programming Languages and Systems, Vol. 8, No. 4, ACM, 1986, pp. 419-490.